
This is how I make the Mini Roses. The main idea is to make the blend sheet and shape it into petal cane. You can make a regular Skinner blend for this project, I just like how the the colors bend together, this way. 

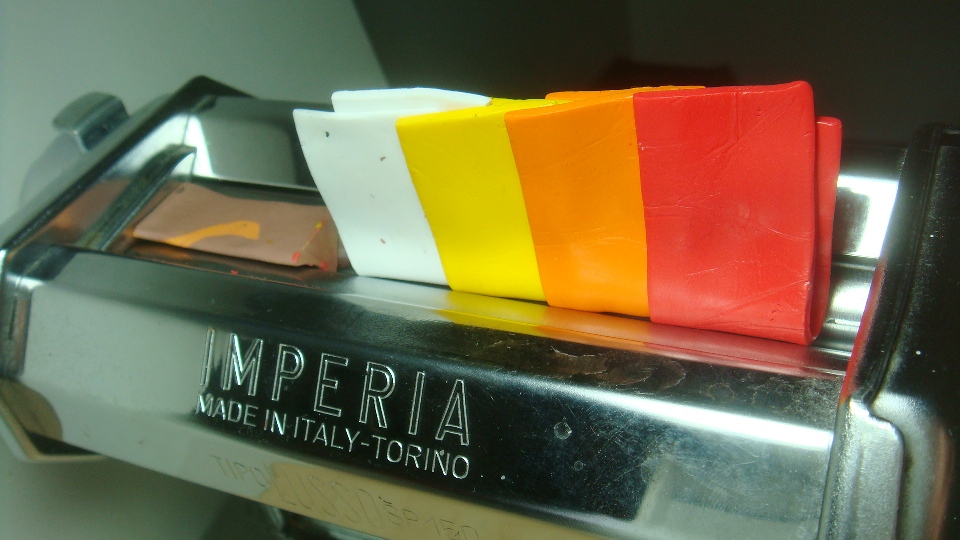
First, I cut strips of 1"x3" clay. Then make a blend sheet as shown. The things that I put on my Pasta machine are homemade sheet reducer. I made them from scrap clay in various sizes. The idea is to be able to control the size of the clay sheet. (Because you will fold the sheet in half and run it through, the sheet will spread and we don't want that to happen).


Fold the blend sheet in half, squeeze the sheet side way together and run it through the pasta machine. One by one I add the sheet  reducer until I get the strip of clay to the si
 ze that I want. In this case, about 2" wide.
 reducer until I get the strip of clay to the si
 ze that I want. In this case, about 2" wide.


As you know, there is the other way to get the strip like this, but I just like it this way. Notice that I only use a small strips of clay. I don't like to make big canes, I feel out-of-control. :)
Cut the strip of clay in to 5 pieces and stack them as shown. 
Cut off both ends of the stack and squeeze each end till it pointed.  Now you will get a log or a cane. Reduce the cane and shape it into a petal shape. Cut out several petal, 10 for each flower.

Stretch one of the petal out and roll it on to the small knitting needle to make the base for the flower. Make it plump like a pear shape. Then stick the petals on the base. Don't push the petals together, m ake them stick together lightly, that way the flower will look light and airly just like fresh flower. 4 petals inside
  and 5 on the outside and make the outside a bit lower than the inside row
  .
.

Add sepals and small stem with green clay.

23 comments:
Excelent!!
Thanks for the tutorial. ;)
Nice explanation - thanks!
This is absolutely beautiful. I can't wait to try these!!!! Thank you so very much for the time that it took to put this wonderful tutorial together!!!!!!
They are beautiful and thank you so much for sharing with us. You are very kind.
Hi Silastones! I am a newbie when it comes to polymer clay craft. I started last year but havent really tried caning, millefiori and others. Then I stumbled upon your site and I am soooo happy. I want you to know how grateful I am for the tutorials you are sharing. Thank you for keeping on inspiring people like me.
I just found your site, and love it! Inspiring stuff.
Beautiful flowers. Thanks for the tutorial!
If you are a beginner at polymerclay, check out an article at beadingprojects.org: "Easy Bead Making: Crafting Your Own Clay and Ceramic Beads"
Hi Ponsawan,
just found your blend tutorial and these lovely flower beads.
thank you for the tutorial.
absolutely beautiful and so useful, another way to blend polyclay, you are just so genorous to show us.
I will have a go at this. Thank you again
Elizabeth K.
XXXX
Just found your page and love what I've seen. Thank you for sharing! I've posted a link to you on my blog at
http://tammie-musings.blogspot.com/
Have a great day!
very intresting.
beautiful, thanks for the great photos and explanation, can't wait to try one out myself
A really great tutorial, thanks so much. I'm a beginner and love tips from the experts! x
Oh, I think slide.com shut down and now I can't see your pictures. Do you have them somewhere else?
This is a great Tutorial!!! Thank you Ponsawan, I really love your work
Thank you Ponsawan! Such an amazing work! I wish there were courses in the area of Buffalo Grove in Illinois...I have the clay, the pasta machine...the cutters...but still so new to this that all in original bag! I paint in oil and I draw..but i am totally fascinated by polymer clay and your works of art! Thank you! If anyone knows about any course in my area, please please let me know..thank you!
Would you do me the honour of accepting the Kreativ Blogger Award? Click on my blog to see more details.
http://momwhispers.wordpress.com/2012/05/31/an-award/
Thank you!
Super nice tutorial, Miss Ponsawan Genius Lady. I love the resulting flowers, you do them so well. :) Thank you for sharing!
Hi! Thank you for sharing! I am sharing this tutorial in my facebook page - facebook.com/sweetsbydonna. Can't wait to try this! But will be using fondant instead of clay though. :) Thanks again! :)
Ponsawan, you do such incredible things with clay! I'd so love to try out this tutorial, but I can't figure out how your "homemade reducer" works. Can you explain or post a link to another page where you've explained it? Thanks!
Beautiful work. The roses look so real. Simply amazing.
Lovely Polymer Clay creations. So talented :)
I wanted to thank you for this great read!! I definitely enjoying every little bit of it I have you bookmarked to check out new stuff you post.
Donna Kato
Post a Comment